Monday, September 1, 2014

CHILDHOOD MEMORIES

When I was growing up I loved the tv show M*A*S*H. Channel 32 (WFLD Chicago) played it at 6:00 and 10:00 at night for years. I watched it at both times as well as it's first run network slot at 8:00 P.M. on Mondays ( meaning that in the days before videotape I got to watch the show 3 times on Monday). Right around the time the show ended in 1983, they released action figures of the show's characters. I bought them all.

The M*A*S*H action figures and vehicles put out but Tristar International

My official M*A*S*H dog tags. These were especially neat because as a
kid I would wear my father's World War 2 dog tags when I would visit him
on the weekends. When I got these I actually had a set of my own.

The toys were put out by a company called Tristar International Limited. Along with the action figures there was other merchandise, such as dog tags, jeeps, ambulances, and helicopters. After acquiring all of the merchandise only one thing remained- an army camp for the figures to live in.

Tristar had created one that could be found in stores. This is what it looked like:


Their action figures were really well sculpted, but their camp looked like cheap plastic. My father and took a long look at it during a stroll through Toys-R-Us . He picked it up off the shelf and said " You know, I think I can build you a better camp than this."

This was no idle boost. Ray Larson had spent his parental life making things for his children and grandchildren ranging from Wizard Of Oz costumes to Star Wars toys and everything in between. We went home and he started compiling photos form the M*A*S*H show in books and trading cards that I owned. This was before the internet ( before we had a VCR as a matter of fact )so his task was a little more difficult then it would be today.

In the pre-video tape era Poppy subjected himself the the M*A*S*H
 title sequence at least twice a day in order to get a feel of what
the camp looked like from this overview shot at the beginning of every episode

One of the things Poppy liked about the Tristar toy that was manufactured for the figures was that it folded up and easily was put away. He decided to do the same thing. Where the company had used plastic, however, he used illustration board ( as he did with most of his 3D creations).

This is the inside of the tent roofs. They were designed so that
each individual roof would fit inside another roof.

The 4 walls of the tents were connected by cloth
that could fold without being torn, then held together
at one end by velcro. The end result was 4 walls
that folded up into one flat piece and reassembled again
with no fuss.
The first thing Poppy did was make a list of what was to be made. Four tents: The Swamp ( home of Hawkeye, BJ, and Winchester), Col. Potter, Fr. Mulcahy, and Hot Lips. Also an office, Operating Room, and Post Op Ward (Later a Mess tent was added). In addition to the tents, there were the things that went into the tents. These consisted of miniature beds, tables, chairs, desks, stoves, and operating tables.
 Mess Tent had  tables with condiments and trays built onto them,
benches for the figures to sit and the area where food was served.


Each tent had at least one bed, a table or desk, foot locker and a stove. 
The oxygen tanks and operating table for the OR.

Once completed, the M*A*S*H camp was an achievement such as I had never seen before and since. The figures had a home to live in and I had a something that was far superior to what was being sold in the stores. When the series ended, Newsweek published this map of the camp, and I set my camp up to match it.


On the surface the camp looked pretty real:


Inside the tents things were happening too:

the Operating Room
The Post Op Ward

Inside the Swamp

It's been over thirty years since my father created this camp.  I recently pulled it out and assembled it for the first time in 20 years. It needs a couple of repairs here and there but overall it has remained in overall good shape. Pretty good for something that was created with Illustration board, tracing paper, and Elmer's Glue.

Thursday, July 31, 2014

LEARNING ANATOMY THROUGH SCULPTING PART ONE: THE HEAD


For the past year I've been stretching my boundaries as an artist. I've experimenting with painting, figure drawing techniques, and design. In an attempt to go a little further and learn something valuable along the way, I've decided to start sculpting

I bought some clay from the art supply store and took it home, where it remains in the box untouched. I honestly had no clue how to start.  I realized I would have to do something soon when a co-worker gave me some of his leftover oil-based (never drying) clay. 


My father sculpted all the time while I was growing up, but I never really tried it myself ( randomly playing with clay as a kid doesn't really count).  The Palette & Chisel Academy Of Fine Art has open studio sculpting from a live model, in addition to quick sketch figure drawing. While I wanted to go try that, I thought it might be a good idea to practice first.  I had a small skull model that I bought for reference about a year ago, so I decided to recreate that in clay.


Once I completed it, I thought that it might be neat to put the individual facial muscles on it. I consulted a couple of anatomy books to see how to go about adding the muscles.


Because the skull was my first creation I was reluctant to cover it up. I also worried that the non-drying clay could get messy if I started adding to it so I decided to add the muscles onto the model skull. Here are the results:


Front

I found the neck muscles so challenging that I had to consult multiple anatomy books for the sides and under the chin. It was fun, but tough. 

Neck


Side

One of the results of this exercise is that I am finding that the way I draw heads is changing. Creating something in 3-D puts a different perspective on the object and that change is reflected into the drawings. My drawn heads seem rounder and more solid then before. They feel more real.

Because I the fun I had and the lessons learned for the head, I have decided to do the same with the entire figure. Stay tuned...


Tuesday, July 22, 2014

NOW ON SALE


My Final Femforce story ( at least for awhile while I work on other projects) came out a few weeks ago and is still available. Here's a description of what's in the issue:


FEMFORCE #167 IS NOW AVAILABLE!!! The long-absent NIGHTVEIL returns to the team, just long enough to reveal a new crisis- the disappearance of her Cloak of Darkness-before vanishing again herself, in a story titled “Roundabout”, written by Mark Heike, penciled by newcomer Jim Sullivan, with finished inking by Scott Shriver. The other wandering team member- SHE-CAT -likewise returns, and makes herself a bit more useful in a tense situation.  A mysterious and powerful stranger forces a dangerous stand-off at the Orlando International Airport, and the FEMFORCE race to the scene to deal with the emergency as best they can, in “Stuck In The Middle”, scripted by Mark Heike, penciled by Rock Baker and inked by Jeff Austin. Then, things turn strange in the 30th century as The BLACK COMMANDO is held captive by girl space pirates, while in the present, the villainous ALIZARIN CRIMSON uses dupes from the future to slip the bonds of her Altrannian prison in  the latest installment in the Adventures of Blackie and Bullets (guest-starring JET-GIRL) , “Future Shock”; written and inked by Bossman Bill Black, with pencils by Eric Coile. If you’ve been wondering what sort of things former military liason to the FF, ROBERTA STROCK has been doing since she was appointed to a cabinet position, read “Time To Take Strock”, illustrated by the FF lead art team of Baker and Austin, from a story by Mark Holmes. You can’t keep a good soldier down!! Next, everyone’s favorite reluctant superheroine YANKEE GIRL is forced to make a difficult decision in “Yankee Ingenuity”, written by Mark Holmes, pencilled by Riccardo Desini, and inked by the redoubtable Jeff Austin. Then, it’s a three-way blast from the past with a trio of never-before-seen “retro” adventures. First, we go back to 1956, for a rare solo story starring one-time FF member The BLONDE BOMBER.  BB finds herself mixed up (in more than one way) with illegal arms dealing and third-world freedom fighters while vacationing in Spain in “Busman’s Holiday”; scripted by Mark Heike, penciled by Manuel Diaz, and inked by Scott Shriver.  Then, in 1948, Miss(the future Ms.)Victory is forced to confront a former Russian ally during the Berlin airlift in “No Substitute For Victory”, written by Mark Holmes, with art by Scott Larson and Jeff Austin. Finally, back during the war-torn years of the early 1940′s, DINOSAUR GIRL  must team up with a half-dozen other costumed operatives to deal with submarines and giant marine demons while breaking up an enemy plot to mine the dangerous ore that gave Vivian Strand the awesome size-changing powers in “The Menace With Eight Arms”, written and drawn by Rock Baker, and inked by Mark Dail. All this plus a special text tribute to the late, great former FEMFORCE artist Dick Ayers by head honcho Bill Black. 

This book can be purchased on the AC Comics website. I have a number of other projects that should be coming out in the near future. Please continue to watch this space for more information.

Monday, March 3, 2014

THE CREATIVE PROCESS- PAINTED COVERS #2

In addition to my interior pencil art, I sometimes get the opportunity to work on a painted comic book cover. This doesn't happen all the time, so when  it does it's a very special event. In a previous post I showed the process of creating a cover for AC Comics. This one looks at it from a different perspective.

Erica Schultz is a brilliant writer of M3, a modern day international spy book that she and comics great Vicente Alcazer created. Although Vicente does all the interior art, the covers have been done by such talents as Bill Sienkiewicz, Andree Maitland, Chris Notarile, Rick Buckler, Jayel Draco, and Nouri Zander. Erica asked me to do a cover as well.

Instead of being a random image like the Gargantarama cover, this one was story specific. My cover was to appear on issue number 9. I started working on it by rereading all the previous issues of M3 as well as scripts for issues 8 & 9. And then I thought and sketched. I sent a series of thumbnails to Erica and Vicente for approval.


 The second image was chosen as the winner and I did a detailed pencil.


Erica and Vicente had a specific person in mind for the faces, so  I did a black and white gouache paintings of the reference:


 Once approved, I moved forward on the final color painting.


M3 is a fantastic book. The first trade paperback and single issues, including #9 (featuring this cover), can be found HERE


Friday, February 21, 2014

PAINTING


One of my goals since April of last year is to stretch myself as an artist. Drawing comics and commercial art is all well an good, but going outside those boundaries is important as well. Not only does it flex different muscles, but also it also effects the artwork already being done.

I've never been much of a painter. I took one oil painting class at American Academy Of Art, which was kind of a flop. My Dad painted all the time- especially with Acrylic. My only use of Acrylic paints was to paint different color outfits on my Star Wars figures as a kid. I decided to give it a try.

One of the nice things about being an artist living in Chicago is all the different resources. The Palette and Chisel Academy Of Fine Arts has a number of open studios. Some are used for quick sketching ( a model poses for one minute to Thirty minutes in a three hour period). Others are used for long poses. I attended one of the long pose sessions with cheap black and white acrylic paints and did a value study of one of the models. Here are the results:

I spent the first half hour doing a pencil drawing. Foolishly, I forgot to take a picture of it.


This was after the first half hour of painting

How the artwork looked after painting for an hour and a half

This was the paining after about 2 and a half hours


I'm having lots of fun with this and am interested to see what my work looks like in the weeks ahead.

If you would like to see the finished artwork, take a look on my Facebook Illustration Page. The album it's in, labeled "2014" can be found HERE

Friday, January 31, 2014

COMING IN FEBRUARY


Femforce issue no. 166, which features the first of two Ms. Victory stories I've illustrated, is coming out next month. Here is a description of the issue:


 A simple trip to feed NIGHTVEIL’s cat turns into an extradimemsional battle for SYNN when a trap set for one heroine actually nets the other, in “Cat And Mouse”, featuring the return of the villainous VIVARNA!! Then, the story you thought you’d NEVER see-  “She-Cat Goes To Prison”, penciled by great new Spanish  sensation Manuel Diaz.  Cellblocks brimming with rioting thieves and murderers are NOTHING compared to the REAL danger ‘Cat discovers in the basement of the ‘State Pen! It’s a lucky thing that Ms. VICTORY  was in the area when a  touring mini-sub ends up at the mercy of a giant squid in “Pumped”.  While plans are made to start the investigation back at FFHQ, we  finally get a peek inside the headquarters of Century International as the master plan of WAMPYR and CIANOSE DJAB begins to unfold. SYNN makes an encore performance, teamed with a heroine from AC’s past in “Just Synn Time”, and we return to the mysterious Dawn World for a second helping of SHE-CAT solo as well, as we come to the stunning conclusion of last issue’s flashback adventure with CAVE GIRL and THUNDA. Then- NIGHTVEIL RETURNS!!  But, is she the same heroine that left? And, back in the 1940′s, DINOSAUR GIRL must contend with an entire island of feral, savage giantesses in “Found World”. Get set for thrills, fun and excitement with stories and art by the usual cast of characters- Mark and Stephanie Heike, Mark Holmes, Rock Baker, Scott Larson, Jeff Austin, Scott Shriver, Mark Dail, and Riccardo Desini.  All this behind a spectacular group-action cover drawn and colored by comics/animation sensation WILL MEUGNIOT!!

This issue will be released on February 26, 2014.

Friday, January 24, 2014

DIGITAL DRAWING

In my lifetime I've seen a number of things change. I remember when vinyl records became CD's, and CD's became MP3s. I remember when telephones had busy signals before call waiting, when rotary dials were replaced with buttons, and when landlines became cell phones. I remember when models used to be built by hand and now they can be build 3D in a computer program. Technology changes the world around us, but that doesn't affect how someone draws, does it? While the basic principles of art stay the same, the materials change. For example, Leonardo Da Vinci never owned a pencil. It didn't exist in his lifetime. Leonardo drew with chalk.

For those of us who live in the 21st Century, it's the computer that effects everything. This includes drawing. There is a ton of digital art being produced. I experimented with digital painting myself when I produced my Christmas card last year.

This illustration was painted completely digitally


I had never really considered line drawing on the computer until recently.  The idea of it intrigued me so I looked into it. What I found was this, there are two ways to do it using either a Cintiq, or a Wacom Bamboo Tablet.

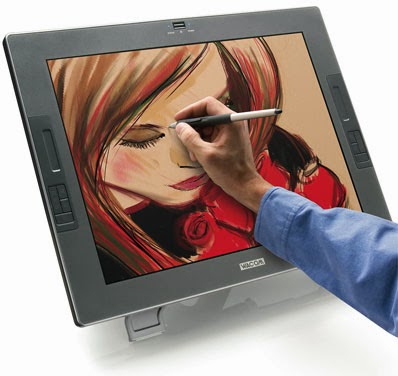
Both devices are plugged into the computer. With a Cintiq, the user literally draws on a screen as if they were drawing on a sheet of paper. It's like having a digital drawing board.

This is how a Cintiq works

The Wacom is a little different. The user  draws on a pad, but needs to look at a separate computer screen while drawing on the separate pad. A Wacom operates in much the same way as a mouse. Both the Cintiq and the Wacom have their advantages and disadvantages.

This is a Wacom Bamboo


For my purposes I decided to work with a Wacom tablet. I started experimenting the same way I started drawing way back when. I pulled out my George Bridgeman book and started drawing from it. It took me a while before a realized that the way to go was to do my "roughs" in "blue pencil" and then the next stage with a "2B pencil".

The rough

The finish

Done with blue "pencil"


The finish on top of the blue


There are things I have yet to learn with this.

After my initial drawings I decided to do my comic book roughs completely digital. Here's the result:

My blueline digital rough

my second more finished digital rough

The final drawn on bristol board by hand


Once the roughs were finished and approved, I finished them up the usual way. I prefer to have the finish be by hand -  at least for right now.

For more information on digital comic book illustration, check out the excellent book by Freddie E. Williams, The DC Comics Guide To Digitally Drawing Comics.