( printed in Femforce #152) had less photos and
more comic booky action shots
After the first set of roughs, I flip the vellum over and use that as an underlay to create the second set of roughs. This second set serves to correct the mistakes of the first set. The second rough is then scanned and set to the editor for approval:
Once this rough is approved I go to finish:
The purpose of drawing the first rough backwards is that it's easier to correct mistakes on the second, so that when I get to the finished pencils all the problems have been fixed:
This is the first rough for the Stormy Tempest story
that appeared in Femforce #155. Something didn't seem right
to me about the first panel.
This is the rough after the corrections were made.
This is the finished pencil page
Sometimes, the corrections don't get fixed in the second rough. When this happens, the final pencil is where the corrections must take place, or they stay in the printed artwork.
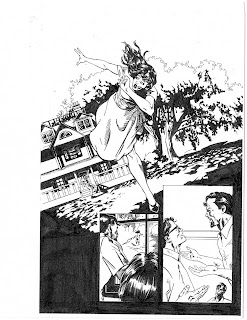
Here is a rough that, because of timing issues, went straight to ink
at this stage without a final pencil. Take a look at the first
panel. The background is disproportionate to the foreground.
As you can see, the tree is really large in comparison to the house. Unfortunately,
the finished printed page had this mistake in it.
Although the finished inked page had the proportion problem, I went back
and finished the pencils on the page. This is how it should have looked.
For me, rough pencils are an essential part of the process of drawing. It might seem like more work, but in the end, the pages look better because of it.


